Building a Blockchain in Swift (Part. 1)
— Blockchain, Swift, Vapor — 4 min read
Designing blocks, the chain, adding transactions and defining the consensus mechanism.
Zoom out
This article is part of the series "Building a Blockchain in Swift". You can find the intro here.
Getting started
I'll keep this very simple and straight to the point. If you want to clone the sample project, you can find it in my Github. It uses Vapor 4.5, Swift NIO 2.33.0, Xcode 13 and Swift 5.2.
How mining works
In a nutshell, in the Bitcoin blockchain consensus is achieved by the adoption of a mechanism called proof-of-work. Long story short, to be able to push a new block to the chain, the node (or miner, in this context) needs to solve a mathematical problem first: to find a specific cryptographic hash for that brand new block that starts with X zeros.
X here is elastic. It expands and shrinks according to how many nodes are in the network and how often blocks are being minted. It’s known as the blockchain difficulty.
Satoshi hardcoded an interval of 10 minutes(-ish) for each new block. By the time I’m writing this article, the miner needs to find a hash for their block that starts with 19 zeros!
It’s as hard & simply as it sounds like. Find this hash and you can push your block. Once you did it, you should send the "proof" of your work (aka the hash for that block) to other nodes in the network so they can confirm that your block is legit, saving them the time (and energy!) to try finding that given hash.
Blockchain and the blocks
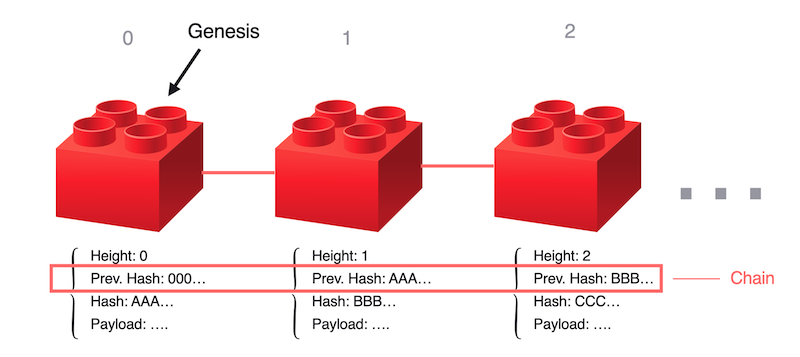
Zooming out: a blockchain, such as Bitcoin, works similarly to a database. It will have a collection of transactions that are stored in the shape of “blocks” and linked together by a cryptographic hash.
Information is added to this database gradually and chronologically. For a block to be valid, it needs to refer the previous block's hash (it's how the chaining happens).
A block will be added one after another. The “position” of each block is known as the height. The first block in the chain is considered the genesis block. Is the only one that doesn’t have a link to a previous block. It holds an invalid address instead

First steps: Transactions
For our experiment, we'll go with a fairly simple transaction. It’s shaped in the following structure:
1struct Transaction {2 let sender: String3 let receiver: String4 let amount: Double5}It takes the sender and the recipient of a transaction, which in our case can be any valid String, and the amount of value that is being transferred. Again, in production this object has many other properties. But that’s what we’ll need for now.
Next, we have the block. But before jumping into it, we need to talk about hashes.
About hashes
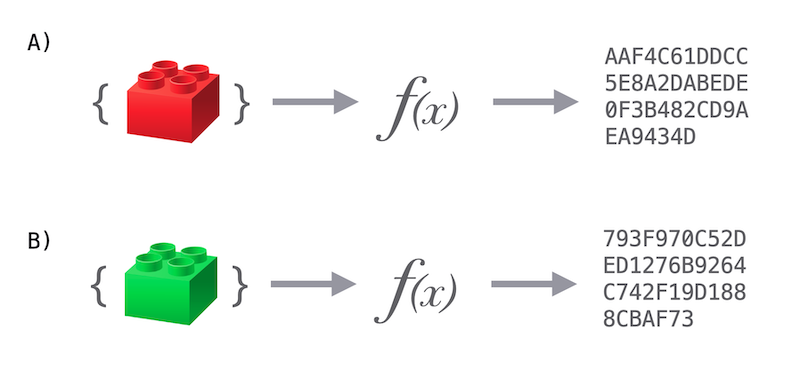
Hashes are intensively used in the blockchain. wallets, contracts, tokens addresses and transactions identifiers are expressed in hashes. A hash is a fixed-length piece of data that represents the "fingerprint" of the subjected input.
Hashes are calculated by hash functions. The benefit of a hash is that if the input changes, the output will also be different.

Each block in the blockchain has a hash. The hash should be computed by consuming all block information. The goal here is protect the integrity of the block data.
Destructuring the block
How does a block looks like from within, you may ask? Blockchains in the market have a ton of features that we’ll not quite need on our own, so to keep it simple see the declaration below::
1final class Block {2
3 private(set) var height: UInt 4 private(set) var previousHash: String 5 var hash: String!6 private(set) var nonce: UInt = 07 private(set) var transactions: [Transaction]8
9 init(height: UInt, previousHash: String) {10 self.height = height11 self.previousHash = previousHash12 transactions = []13 }14 15 func add(transaction: [String: AnyHashable]) {16 transactions.append(transaction)17 }18
19 func incrementsNonce() {20 nonce += 121 }22}Let me walk you through it:
- First we define the block's properties. It will have a
heightandpreviousHashvalues injected upon initialization. - A block has no hash until it is minted. So it will be null first, but we'll assume it is computed when we try to add it to our blockchain.
- The block also has the ability to add transactions to itself. These transactions will be flatten into a JSON object that will be used in the hash computation.
- There's a property that we didn't cover yet — the
nonce. Don't worry for now. This is just a numerical value that we'll help us in the mining process. We'll cover it later.
The block can only be minted if its hash complies with the blockchain's current difficulty (which is the mathematical problem it needs to solve — we want to find a hash prefixed with a certain repetition of zeroes).
For this example, we’ll go with a custom hash for our block that uses the SHA-1 hash function. So we’ll need to convey some kind of key that wraps all our block data so we can hash it.
⚠️ SHA-1 is an insecure cryptographic hash function. Bitcoin uses a double-hashed SHA-256 hash, and you should consider more robust hashing algorithms as well. For the sake of the experiment we’ll go with SHA-1, though.
1func generateKey() -> String {2 let transactionsData = try! JSONEncoder().encode(transactions)3 let transactionJsonString = String(data: transactionsData, encoding: .utf8)!4 return String(height) + previousHash + String(nonce) + transactionJsonString5}⚠️ Disclaimer:
Transactionwill need to conform toEncodableso it can be encoded to JSON.
Great! Now we have a single argument to feed our SHA-1 function and get our block a hash.
Next, let’s design how the blockchain will look like:
1final class Blockchain {2
3 enum Error: Swift.Error {4 case invalidBlockHash5 }6
7 private(set) var blocks: [Block] = []8 9 init(genesisBlock: Block) throws {10 guard genesisBlock.hash != nil else {11 throw Error.invalidBlockHash12 }13
14 blocks.append(genesisBlock)15 }16
17 func add(block: Block) throws {18 guard block.hash != nil else {19 throw Error.invalidBlockHash20 }21
22 blocks.append(block)23 }24}The blockchain holds the reference for the blocks and takes a block upon initialisation (the genesis block). Finally, it has the capability to add more blocks to the chain.
We throw an error if the block was tried to be added to the chain without a hash.
If you take a closer look, you’ll also notice that there’s no reference whatsoever to the kind of value in a transaction (aka the currency). This is true in blockchains in the market as well. Bitcoin, Ether, Ripple, etc. are just names given to the value that is being transferred from a wallet to another. There’s no real (virtual or material) image of it. It is just a value in the ledger, which by convention is known as the cryptocurrency itself.
Next steps
Next we’ll explore the mining feature. Follow up for Part 2.